AMAZON multi-meters discounts AMAZON oscilloscope discounts
The true servomechanism is generally recognized to be similar to that outlined in Fig. 501. Its operation is basically that an input signal will be strengthened in the servo amplifier and produce enough output power to operate the servo. When the servo motor (in this case) runs, it not only moves the controlled element ( elevator, as shown, or rudder) but it also moves a feedback-potentiometer wiper arm a proportional amount.
There is an electrical connection between the wiper arm and the servo amplifier, and an electrical signal is fed back to the amplifier to report the position of the control surface. This feedback is used to balance the input signal in one way or another. When the feedback signal has neutralized the control signal the servo motor comes to a stop. Any new signal fed to the servo amplifier must unbalance the zero movement signal condition existing in the amplifier. The polarity (or phase) of the input signal in relation to that of the feedback signal will determine the direction in which the servo will drive the control surface. For example, assume that the signal input is +2 volts with respect to ground. The servo amplifier strengthens this signal, converts it to a current output which causes the motor to run clock wise. When the motor runs it tilts the elevator control surface up, and it also moves the wiper arm of the potentiometer nearer to the negative end of the resistance. This negative voltage feedback to the input cancels the input signal when the elevator is tilted, say, 10°.
The elevator will remain deflected this amount as long as we keep sending the signal which produced the +2-volt input.
Now assume we stop sending this signal. Immediately the +2-volt signal at the input of the servo amplifier vanishes. All that remains is a -2-volt potential from the feedback potentiometer. This negative signal causes the motor to run in the opposite direction, moving the elevator control surface back toward neutral, and at the same time moves the feedback potentiometer wiper arm toward the center of the resistance.
When the potentiometer wiper arm is exactly centered there is no voltage difference between this point and the center tap of the batteries; thus there is no longer any negative voltage being sent to the amplifier input. The motor stops and the servo is neutralized. This is a self-neutralizing type of proportional control servo. In the absence of any control signal input, the motor will always return the wiper arm to this point of zero feedback voltage.
It is interesting to note that the servomechanism is actually an active element in itself. It can exhibit some peculiar characteristics without any help from the rest of the control system. For example, it can act just like a tuned circuit, and it does have a resonant frequency. When improperly designed it can oscillate gently or violently.
The sensitivity of the servomechanism is dependent directly upon the amount of gain of the servo amplifier. By sensitivity we mean its ability to position precisely the surface it controls. The more gain the amplifier has the smaller the input signal can be and still produce motor movement. Also, the more exact the cancellation of the input signal has to be through the feedback voltage.
Low amplifier gain, on the other hand, requires a much larger input signal and has less exact signal cancellation. For example, in a low gain system, the motor might not run until the input signal exceeds 0.5 volt. When the feedback cancels the input, it can cancel down to 0.5 volt. The motor stops running but the control surface, instead of being positioned to exactly 10° as commanded, might have been moved only 8°. By increasing the amplifier sensitivity so that the motor runs with a signal of .1-volt unbalance, then the positioning will be more exact--about 9.6°.
High amplifier gain, then, is needed for more exact control surface positioning. Amplifier gain that is too high can cause oscillation. The mass, and thus inertia, of the motor is one reason for oscillation. For example, with a +1-volt signal, a servo amplifier gain can be so high that cancellation down to .01 volt is required to stop motor rotation.
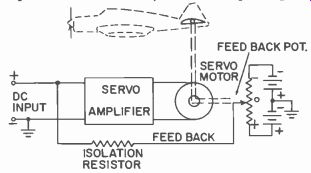
Fig. 501. A true servomechanism. INPUT
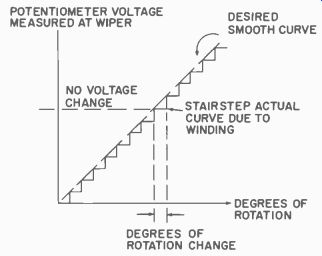
Fig. 502. Stairstep voltage out put of potentiometer.
Now, with the +1-volt signal applied, the amplifier sends a large amount of power to the motor. It rapidly drives the wiper arm and control surface toward the -1-volt position on the feedback potentiometer. Because of the inertia of the motor it actually overshoots this position. Instead of exactly cancelling the input signal the feedback signal reaches a value of, say, -1.2 volts. This -0.2-volt difference in signal causes the motor to reverse. Again it overshoots due to inertia.
And so it oscillates about this -1-volt feedback signal position. The oscillation may last a long time or a short time, depending on the amount of damping such as friction in the motor bearings, potentiometer arm shaft, etc. Thus, in a servomechanism, the right amount of gain is needed for fast, accurate positioning but not so much gain that we get oscillation.
There is another factor we should mention regarding the exact positioning and that concerns the fineness or resolution of the feed back potentiometer itself. Remember, if a wire-wound potentiometer is used, there is a voltage jump between each turn the wiper arm rests on. The voltage output is not precisely smooth but varies in a stair-step fashion, as shown in Fig. 502. Because of this stairstep situation the voltage changes in jumps. This, too, can cause oscillation. When the amplifier gain is excessive the feedback may never be able to cancel the input exactly.
The amount of voltage across the feedback potentiometer is independently important. It is possible, by regulating the amount of this voltage, to establish a servomechanism gearing ratio. For example, we can set the feedback voltage so that 0.5 volt is produced for, say, 4° of potentiometer wiper arm rotation. (This is the equivalent of saying that a 0.5-volt input is equal to 4° fin deflection, assuming complete signal cancellation during operation.) Now suppose we want to get a larger fin deflection for the same input signal. If we reduce the voltage across the feedback potentiometer so that it produces 0.5 volt for 8° potentiometer wiper arm rotation, we now will get this increased deflection. All we changed was the voltage across the feedback potentiometer. To decrease the deflection, we increase the voltage.
This can be put to use when trying a new system with a small deflection of the control surface (to start with) as a requirement.
Later we can increase the voltage across the potentiometer to get the amount of deflection needed for stunting, etc.
Let us go back now to the concept of motor mass and inertia. Of course the gears and fin also have mass and thus inertia. We will assume that all masses can be lumped into one and we will call this amount of inertia (I).
Friction in the system can reduce or prevent the output shaft from oscillating. Damping can be provided by means other than friction.
For example, we can connect a 10- to 50-ohm resistor across the motor leads. When the relay causing the motor to run opens, the motor armature winding produces a current (while the motor is coasting) which finds a path through this resistor. Due to this current, the armature now becomes a magnet and because the field poles are magnets, there is an immediate drag which makes the motor slow down. This is rate damping. Note that in this case, Fig. 503, the amount of drag (due to the current) is directly proportional to the speed at which the motor coasts. The faster it turns when the relay opens, the more drag, etc. We want to lump all the damping forces together, as we did the masses. Remember that friction is proportional to speed, too. The greater the speed the greater the friction.
Finally, let us consider the force which actually makes the motor run. This force is directly proportional to the current through armature windings and since this, in turn, is governed by the amplifier, we will consider that this force does come from the amplifier and assign the letter G to represent this.
The response of the servomechanism is governed by these three factors: Moment of inertia, damping and gain. We can arrive at some interesting facts about a servo system by analyzing its response to various values of these factors. For example, there is a relationship which will tell us what the natural, or resonant, frequency of the servo will be:
G Resonant frequency (hz) = I 2.
The inertia (I) must be expressed in Slug ft'--32.2 / Weight in lbs.
The gain must be expressed in foot pounds of torque. Damping is expressed in foot pounds per radian. An example, using a commercially available servo motor, is worked out for you on page 100.
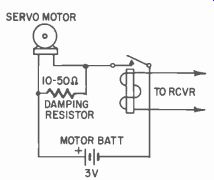
Fig. 503. A simple method of providing rate damping.
It is also possible to tell, by mathematical analysis whether the servo output shaft will position the fin quickly and accurately to a given position without hunting, whether it will oscillate, or whether it will position it very slowly.
Actually, what is done mathematically is to arrive at a balance between the three factors which will give the desired response quickly and accurately to position the control surface without oscillation, or with just one overshoot. In most cases, the response of a servomechanism is primarily governed by the gain of the amplifier. If a system tends to be unstable we must reduce the gain or increase the damping. The damping is increased if we need rapid response; we reduce the gain if the response is faster than is actually needed.
In large servomechanisms there is another method of rate damping.
It operates on the premise that quickly changing signals will be amplified more than slowly changing ones. In practice, this is accomplished by means of a rate network (Fig. 504). It works like this:
When the input signal is a rapidly changing one, it is equivalent to a high frequency and thus finds capacitor (C1 ) a short circuit. This feeds a large input signal to the amplifier and produces a higher torque in the motor and it moves quickly. By the same token, if the feedback signal is changing rapidly, it passes through the capacitor quickly and acts as a braking signal to cause the output shaft to position quickly and accurately with a minimum of oscillation.
There is still another characteristic of a servomechanism you should note. A servo acts somewhat like a low-pass electronic filter. For example, if we were to send it a signal for up elevator and then down elevator, both times calling for full elevator deflection, and sending these signals at the rate of one signal per second, the elevator would .....
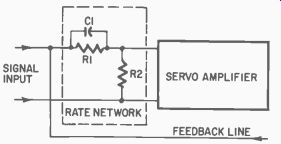
Fig. 504. A servomechanism with a rate network input has rate damping. As
frequency of input increases, C1 becomes a short circuit. When very-low-frequency
or dc signals are used, R1 allows this voltage to get to amplifier.
... probably follow exactly as it should. If, however, we were to increase the rate at which we send these signals to, say, 50 per second, we might find that the elevator just doesn't deflect either way at all. The signals are changing so rapidly that the motor can't follow. The factor governing what this upper response limit will be is primarily the torque-to-inertia ratio of the motor. This means the armature should have very little mass ( weight) and a very high torque capability. In fact, this torque-to-inertia ratio concept is used in evaluating how suitable a motor is for a servosystem.
As an example, suppose we get a signal from a potentiometer in place of a discriminator signal to a servo amplifier, as shown in Fig. 505. Here a second potentiometer is connected like the feedback potentiometer but with the voltages reversed. The shaft of this potentiometer is connected through a translating yoke to the output gear of a second motor. This motor has a variable resistance in series with its battery to control its speed.
When this second motor is turned on, and its output gear turns, it will move the potentiometer wiper arm back and forth at a rate determined by the motor speed. At a low speed we mark the extremes of the elevator deflection. Now we gradually increase the motor speed, thus increasing the rate of the input signal variation. It is possible, if our servo is not too heavily damped, that we will be able to determine the servo resonant frequency. This will be that frequency (motor rotation speed) at which the elevator deflection is greater than at any other motor rotation speed with no increase in the voltage across the input potentiometer. The frequency will be directly equal to the number of motor revolutions per second (motor speed) since one revolution is equal to one cycle of input voltage.
We can also determine the bandpass. The upper limit is that frequency at which the elevator deflects only about three-fourths of its low frequency input value. The bandpass is that range of frequencies from zero to this amount.
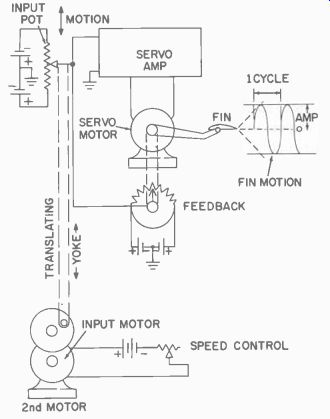
Fig. 505. Determining bandpass characteristics and linearity.
Why would we be interested in these factors? First, if we arc unable to determine any resonant rise our servo is heavily damped and we
probably could utilize more amplifier gain. Second, we do not want to send control signals at a rate near the resonant frequency of the servo. This can cause the airplane to be over-controlled or, in cases of little damping, can cause us to lose control. Third, if our bandpass is very low, we need more gain or a more rapidly responding motor.
Design notes
Normally, when we build a proportional control servo system for a radio-controlled model, we select a suitable motor, add a feedback potentiometer and try to select an amplifier which will make it operate.
It will be well to spend a few moments discussing some of the design concepts which would apply to this kind of servomechanism.
Start the whole process by selecting a servo motor. That shown in Fig. 506 has the necessary limit switches and feedback potentiometer built onto it by the manufacturer.
We are furnished some specifications with it:
Weight 2 oz.
Power Excess of 32 in. oz. (through the gears)
Voltage 3 volts
Current drain 110 ma running, 325 ma stall
Feedback pot
Resistance furnished as requested
(2,000 ohms)
Consider the power rating first. This specification is torque and it is in inch ounces, 32 inch ounces of torque. Torque, remember, is force times distance, so if we put a one-inch lever on the motor shaft and hang a 32-ounce weight from the end the motor could move it.
If we had a four-inch lever, we could lift eight ounces. Whatever the weight and the lever arm, the two, multiplied, must equal 32.
We want the servo to move a model airplane elevator. Some tests and calculations have shown that around 5 inch ounces of torque is adequate for control surfaces having up to 40 square inches of area.
Therefore, a motor producing 32 inch ounces of torque is more than adequate.
With a servo motor selected, we must next determine the amplifier that will be needed to drive it. We will select transistors, of course, because of their small size and low voltage requirements. With a stall current for the motor of 325 ma it means that the starting current must be somewhere near this value and, even if it is only momentary, the transistors which drive the motor must pass this current easily. We shall refer to these as the motor controlling transistors. We will require one n-p-n type and one p-n-p type and both should have as nearly identical characteristics as possible because one will make the motor run in one direction while the other will make it reverse. A transistor manual indicates that the 2N143 and 2N144 will do nicely since they have the following characteristics:
lc hfe (alpha)
Collector volts
0.8 A 0.975 30
We do not need 0.8 ampere (800 ma). We could have selected a pair which had about a 500 ma Ic rating, but since these are a matched set, we chose them.
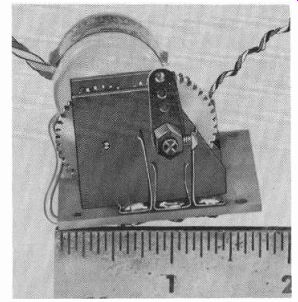
Fig. 506. Servo motor complete with limit switches and feedback potentiometer.
Next we need a set of characteristic curves for these transistors, such as those shown in Fig. 507. Since the load resistance will be small, we can assume that there will be little voltage drop to the collector until the current gets high. When the motor is running at full speed, it will drop the 3 volts across its terminals but we won't mind that for

Fig. 507. Typical transistor characteristic curves.
it will then be running. What we want to determine, from the characteristic curves is the amount of base current we will need to produce the required motor-running current.
In Fig. 507 there is a dashed vertical line up to the 325 ma level and an X marked near the base current line required for this collector current. Actually, the vertical line might slope to the left which would indicate that the collector voltage reduces as we draw more current, but for our purposes here we need not be concerned with that. The major fact is that we will need around 15 to 17 ma of base current for our motor controlling transistors.
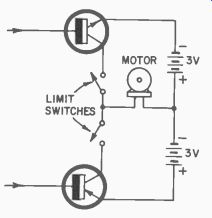
Fig. 508. Motor circuit with limit switches.
A basic circuit for the motor-controlling section is given in Fig. 508.
Note the limit switches in the collector circuits of each transistor. These will automatically open the circuit when that particular transistor drives the motor lever arm to the desired limit.
We have two choices on the configuration. We can direct couple them into the bases of the motor-controlling transistors (Fig. 509-a) or we can couple them through a resistor as shown in Fig. 509-b. There isn't too much difference in the operation.
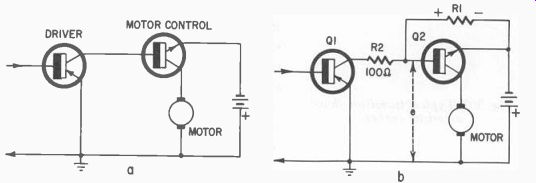
Fig. 509. Methods of connecting driver transistors. Half circuit is shown
in each case.
For the driver we must select a transistor which will be able to pass at least 20 ma collector current when connected to the battery through a load consisting of the base-emitter resistance of the motor driver. We assume this total resistance to be in the order of 1,000 ohms.
In the circuit of Fig. 509-b, when Q1 conducts and current flows through R1, the polarity of the voltage drop across this resistance
would be as shown. This would apply a forward bias to the motor controlling transistor and cause it to conduct. R2 is a small isolation resistor used to allow this positive potential to exist at the motor-con trolling transistor base even though Q1 conducts to an extent which would make it a short circuit. R2 should be only about 100 ohms. The value of R1 then would have to be determined from the current through it, remembering of course, that it is in parallel with the base emitter resistance of the motor controlling transistor. Both in parallel should not produce a voltage drop between base and emitter larger than specified in the transistor manual.
Assume that we will use the circuit of Fig. 509-a. We would then look in a transistor manual for a pair of transistors, one n-p-n and one p-n-p, with collector ratings of at least 20 ma, for which we can draw a load line for 1,000-ohms. If the collector will be at 3 volts when the current is zero, this will establish one point on a curve such as Fig. 507. We can establish the other point by considering the collector voltage to be at zero when the full voltage drop appears across the load at 20 ma. Now, look at the curves again to see what base current will be required for the driver to produce the collector current swing.
A 2N187 and a 2N377 were selected for our p-n-p and n-p-n types respectively and each of these has a collector current rating of around 100 ma. We chose the base current bias so that only the required collector current of 20 ma actually flowed in the circuit.
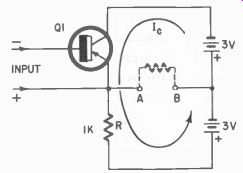
Fig. 510. The input transistor circuit.
An input transistor is needed which will supply the necessary base current to the motor-controlling transistors. Because of the complementary symmetry configuration of the driver circuit the input voltage must vary from positive to negative to produce the positive and negative base currents for each type.
The bridge configuration of the transistor circuit can be seen in Fig. 510. When the transistor collector-to-emitter resistance is equal to the 1,000-ohm fixed resistor R, there is no voltage difference between points A and B and thus no current flows through the dotted resistance. The dotted resistance represents the base to emitter resistance of the complementary symmetry driver transistors.
When, due to an input-signal current which makes the transistor conduct more, the resistance between collector and emitter is less than the fixed resistance, point A will be at a higher negative potential than B and thus negative with respect to B. Current will flow from A to B.
When the current through the transistor decreases, its effective resistance is higher than that of the fixed resistance, A is less negative than B and current flows from B to A. A is positive with respect to B.
Thus, through this bridge we have been able to get the bidirectional currents required to cause our transistor drivers to conduct and, in turn, the motor-controlling transistors and the motor itself.
Note that the input signal to the transistor of Fig. 510 need be only of one polarity. If we assume that it is operating class A, it only needs to conduct more or less to unbalance the bridge. It is also interesting to note the possibility of varying R with motor rotation to provide feedback, thus eliminating the requirement for extra feedback potentiometer batteries.
Based on the foregoing design, the circuit of Fig. 511-a was constructed and although the motor-controlling transistors differ (these happened to be on hand for the test) the operation was as expected.
The servo operated smoothly and with a quick response. Positioning was accurate and easily controlled by varying the input potentiometer arm. The graph shows the response during the test.
It is recommended that when the circuit is constructed, the motor circuit be broken initially at Z in order to see if balance can be obtained. This is done by placing the leads of a voltmeter (we used the 6-volt scale of a 10,000-ohm-per-volt instrument) between points A and B. The input potentiometer was set at about half rotation (it should be a linear potentiometer of about 15,000 ohms). The servo motor potentiometer was adjusted by hand until there was no voltage differential between A and B. The motor circuit was then closed at Z and the input potentiometer varied.
If the feedback resistance value (R) is changed in the wrong direction by the motor, the motor drives immediately to one extreme deflection or the other and no intermediate positioning can be obtained. When the potentiometer is moved in the correct direction to balance the bridge, a small movement of the input potentiometer wiper arm will result in a small displacement of the motor lever arm. In the servo used, the feedback potentiometer had three leads-red, green and yellow. The wiper arm was connected to the red lead. All that was necessary to correct the direction of the feedback potentiometer rotation (we had it incorrect the first time) was to change the connection to the emitter from green to yellow leads. We then had to loosen the servo motor lever arm and reposition it in the center position when circuit balance was obtained with the input potentiometer set at center and the feedback potentiometer adjusted as mentioned previously for balance (zero voltage) between A and B. The feedback potentiometer should have at least a 2-watt rating.
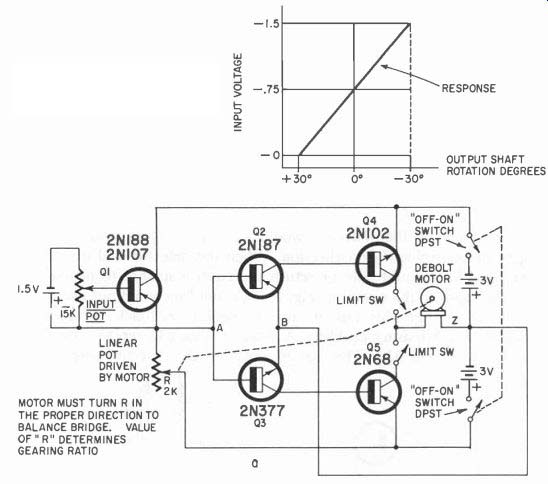
Fig. 511-a. Motor control circuit.
For radio control applications this kind of servo system simplifies the detector problem. A simple slope detector might be used instead of a discriminator to provide a unidirectional negative voltage with a change in tone frequency. This would require, however, that a tone be transmitted all the time since zero voltage out of the detector would result in full control surface deflection., It might be possible to provide a fixed bias for the input transistor as in Fig. 511-b. In this case, the minus output from a slope detector would add to the bias resulting in a greater negative voltage. This results in control surface deflection in one direction, while a positive
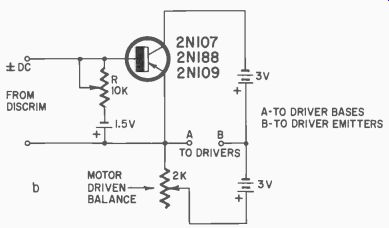
Fig. 511-b. Bias method to allow plus-minus input from discriminator. Adjust
R for balance.
voltage out of the detector would cancel the bias and result in opposite control surface deflection. When the detector had no output, the fixed bias would hold or return the control surface to neutral.
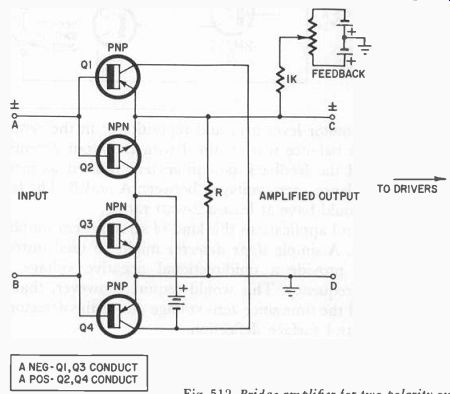
Fig. 512. Bridge amplifier for two polarity output. Do not connect B and D
together through ground.
The input to the circuit in Fig. 511-a is unidirectional but one might want to change this circuit, use a regular feedback voltage and eliminate this biasing problem. A possible circuit to replace this input is shown in Fig. 512. This circuit amplifies the detector output. The resistance R may or may not be necessary. Note that point B must not be connected to D, but D should be connected to the common ground wire of the servo amplifier.
In designing the servo amplifier, one may use many methods. Essentially, a current gain is desired which might serve as the basis for the number and types of stages used. For example, in the case considered, the motor requires 325 ma maximum. We could assume that the out put of a detector is 50 microamperes (or less). If we use the 50 microampere figure, the current gain required is:
0.3 300 X 10^3
= 6,000 50 X 10' 50
We had noted previously that the ht. rating of the motor-controlling transistors was 0.975, and we remember that current gain is:
Solving this we get:
With a current gain of 39 for the motor stage, this leaves:
If we select a motor-controlling transistor with a gain of 15, then a first stage with a gain of 11 will be more than adequate. Any method of connecting these three transistors so that they will produce these individual stage gains and a bidirectional current output will accomplish the servoamplifier design purpose.

Fig. 513. Current gains specified in blocks.
Fig. 513 shows a block design of this concept. The overall gain is the product of the individual stage gains and totals more than 6,000.
The linearity problem
Up to this time we have been concerned with the operation of the servomechanism. Now that we have a basic system, let us discuss refinements. The biggest improvement in performance will be to improve the linearity.

Fig. 514. Graph showing non-linearity. Note linear portions reached when some
collector current flows.
Fig. 514 shows a curve for a complementary circuit such as we used for the drivers. This same type of curve may apply also to the motor-controlling transistors. The important concept here is that, since we are using no bias on either transistor, they are theoretically operating on the lower portion of the characteristic curve. This introduces a nonlinearity just as it would in a vacuum-tube amplifier. For proper design of the servo amplifier, each stage of the transistor amplifier should be so biased that it operates on the linear part of the characteristic curve as much as possible.
Estimating servo performance
While it is possible to analyze a servomechanism's performance mathematically, this is beyond the scope of this text. We will, how ever, try to show some basic calculations which can be made and how the answers arrived at may help one to estimate the performance of his servo. One of the most important concepts of the completed system is its resonant frequency and we stated a formula for this earlier:
G Resonant frequency (hz) = 2w
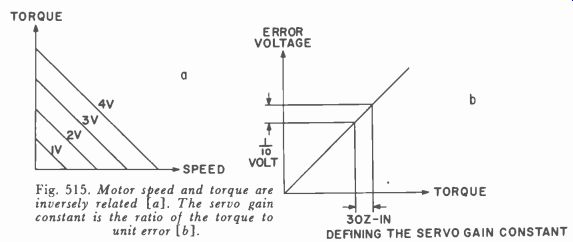
Fig. 515. Motor speed and torque are inversely related [a]. The servo gain
constant is the ratio of the torque to unit error [b].
In general, the higher the resonant frequency the better the servo performance will be. Now refer to Fig. 515-a which is a theoretical motor speed-torque-voltage curve for the servo motor. We see that the speed and torque are inversely related and that both are proportional to the applied voltage. In Fig. 515-b we have shown a curve which one might obtain experimentally by fastening a spring gage to the servo motor output lever and then varying the input voltage to the servo amplifier. This is done to obtain a numerical value for G which is the servo gain constant:
torque G = unit error
The error voltage would be the difference between the input and feedback voltage and that amount which causes the motor to turn.
The moment of inertia ( I ) could be obtained from the manufacturer. For the little motor shown previously, an estimated value is 10 X 10' slug ft^2. For purposes of calculation, we are going to estimate that the torque is linear and that through the amplifier we obtain 3 ounce-inches of torque for a 0.1 volt error. Our unit error then is 0.1 volt. (Note: G = 3 ounce inches. To convert to foot pounds, we divide G by 12 X 16.)
i 3 Ni 0.0156 (12)(16) 10 X 10' 10 X 10^-6 freq = 6.28 6.28 15600 .1
=-NI 10 = N 1560 39.5 6.28 6.28 6.28
= 6.29 hz
This is not too high a frequency. Servomechanisms may have resonant frequencies from 20 to 50 hz depending on the type and application, but it is high enough for our purposes. This means that if the servo started hunting, it would oscillate the output lever at this frequency.
The best servo motor is one which has a high torque-to-inertia ratio. Generally, this means it must have a long armature with a small diameter which would cause the diagonal of Fig. 515-b to be more vertical. We can use Fig. 515-a to estimate how much voltage will be required for a given speed and torque output. The speed determines how fast the servo will move and the torque, of course, will determine the control-surface load that can be moved.
Relay servomechanisms It would be well to spend a few moments discussing that type of servo amplifier which uses relays to energize the motor. In general,...
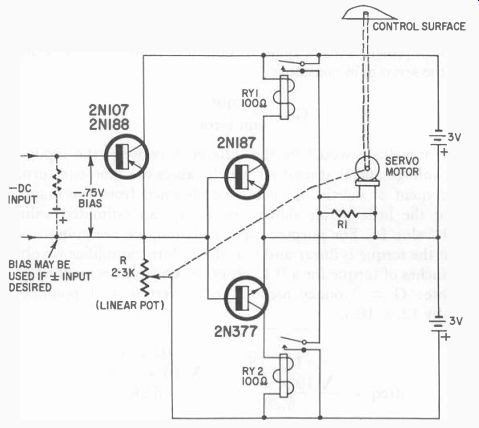
Fig. 516. Relay servo amplifier. Relays should operate on 3 volts, 20 to 30
ma.
...the system is similar to those previously discussed except that each time the relay closes full power is applied to the motor and there is no gradual power variation as with the non-relay type. Such a circuit is shown in Fig. 516.
Note that when the dc input is-0.75 volt, both relays are open.
As the input level goes toward zero volts RY2 would close, and as the input increased to-1.5 volts RY1 would close. As each relay closed, the motor would run until, in moving R, the circuit would again be balanced, causing the energized relay to open.
The problem with this kind of servo is the overshoot. Since full power is applied to the motor right up to the last moment as the circuit approaches balance, the motor will be more likely to coast past the desired position. When it does so, the input circuit is unbalanced in the opposite direction, due to excessive change in the setting or R, and the other relay closes and applies full reverse power.
If there is not enough damping the system will hunt. The motor will oscillate back and forth as R continually overshoots the balance position. It is possible to increase the damping by adding R1, a 10- to 50-ohm resistor across the motor terminals, as well as by adding friction to the motor shaft.

Fig. 517. Relay servo "dead zone".
Fig. 517 illustrates the effect of the relay dead zone on the accuracy of positioning. Since each relay has a definite pull-in and drop-out current value, the input voltage can change some amount before the motor is actually energized. The closer we make the pull-in drop-out current adjustments, the more likely the system is to oscillate due to overshooting the balancing point.
In the design of this kind of system, you will need to expend great effort to obtain a good tight damping system. In fact, you should incorporate a magnetic brake in the motor-drive circuit so that when either relay is energized, the brake is released. When both relays are de-energized, the brake immediately locks the control system in place. This, together with a very minimum difference between pull-in and drop-out values of relay current would make this system very fast, accurate and practical.
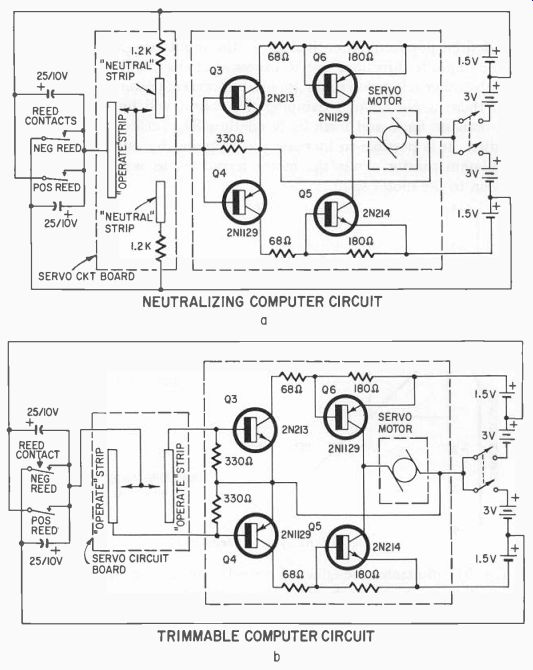
Fig. 518. Circuits adaptable to proportional control. Circuit above shows
arrangement for a neutralizing servo circuit while lower circuit is the trim
type servo.
Some proportional control servo circuits
The circuits of Figs. 518-a and 518-b are for servo amplifiers in which the motor drives sliding limit-switch contacts to provide a neutralizing operation in ( a) and a positioning operation in (b).
These circuits are designed to operate with a standard reed decoder.
In Fig. 518-a when the negative reed closes its circuit-3 volts ( with respect to their emitters) is applied to the bases of Q3 and Q4.
This causes Q4 to conduct and it, in making Q4: conduct, sets the motor running. As the motor runs, the slider is moved off the operate strip and only makes contact with the upper neutral strip.
While the slider is in contact with both the operate and neutral strips, the operating voltage is developed across the 1,200-ohm resistor which is between the-3-volt and +3-volt terminals.
When the reed is opened, the only input to Q3 and Q4 is the potential from the upper battery so the motor reverses and drives the slider to the no-contact center section which is neutral.
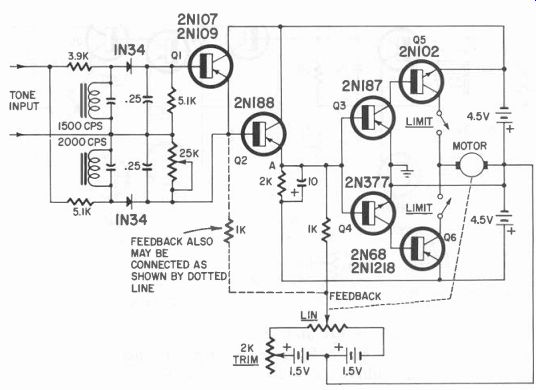
Fig. 519. Experimental servo driven by a discriminator.
In Fig. 518-b the neutral strips have been omitted, so the movement of the motor (and thus the control surface) is proportional to the length of time the signal for either reed is on. To reverse the motor, the opposite reed must be energized.
This amplifier might be used in other applications with a different type input for Q3 and Q4.
Fig. 519 shows a servo amplifier connected to a discriminator of the type described earlier. The operation was quite satisfactory and the sensitivity adequate for most control purposes. The theory of operation is that the discriminator voltage applied to Q1 between base and emitter will govern the flow of current through this transistor. Since the current has to pass through the base and emitter of Q2 to complete the circuit to the positive terminal of the lower battery, it controls the current of Q2. A change of current through Q2 and its 2,000-ohm emitter resistor shifts the bridge balance so that either a positive or a negative voltage is presented to the bases of Q3 and Q4. The feed back potentiometer connected as shown will cancel the bridge unbalance electrically when it is driven in the proper direction.
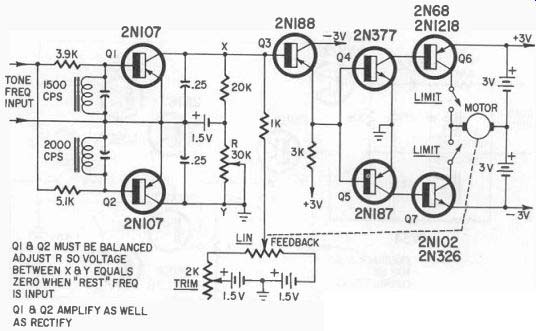
Fig. 520. Discriminator di odes replaced by transistors.
In Fig. 520 transistors Q1 and Q2 substitute for the 1N34 diodes used in the circuit of Fig. 519. Biased to a point where they rectify as well as amplify, additional system gain can be obtained. Circuit balance can be very difficult and carefully matched parts are needed for good linearity. Differences in the input signal (tone) level, transistor characteristics, tuned circuit Q and filter capacitor leakage must all be balanced for a perfect system. Each variation in balance reduces the abilities of the circuit and the low-tolerance parts required (1% or 5%) increases the cost considerably.